
 Making videos for online is simple enough, but at some point you might want to take your content to television like I have with Motorz. Making a commitment to going from a variable length video series to a half-hour (22 minute) episode series is quite an undertaking. As you explore your options for broadcast, you will quickly find that each channel/network has different requirements. And, depending on their age and method of broadcast you may be required to send in your video content with closed captioning (CC).
If you are in the same situation I was in a few months ago when I first found out that I had to include closed captioning for your video content, you are overwhelmed with information and shocked at the cost of doing this. My first knee-jerk reaction was to call upon other producers to ask how they did it. All of them used a third party service. You’d ship them your videos (digital or tape) and they would pay a transcriber to listen to every spoken word in your content and type those words into a software program that matches the time code of your video. A very daunting task, indeed.
I started looking into these services only to find prices that ranged $100-200 per 22-minute episode. Factor in the cost of shipping, your media, and the number of videos you have (in my case it’s 12 per season). That’s an extra $2,000 or more just to meet a FCC requirement for broadcast. If you’re on a budget too, this isn’t easy to stomach. Also consider the turnaround time is slow when relying on an outside service.
After being quite disgusted at the thought of using a service, I looked into the option of transcribing my own show in-house using software. How hard and expensive could it really be? As you’ll soon learn, it’s not hard or expensive at all. My previous search turned up software that cost in the neighborhood of $7,000. That’s right… seven thousand dollars. I won’t mention the name of the software, but it runs on a Mac. [rant on] I’m sure they are working very hard to justify that price tag, but c’mon–$7k? Really? I don’t know about you, but I’ve never paid that much money for any software program or a computer for that matter, and I’ve been computing since the days of the Commodore PET. Talk about highway robbery and taking advantage of a FCC broadcast requirement. If you are a small video producer or a University this is not an option. Moving on! [rant off]
I was about to give up and use a service until a friend told me about another software application he found for the Mac & PC called MovieCaptioner (previously called MovCaptioner) from SynchriMedia. The price? $99. Excited, I read all the information and watched the videos at their website. Fortunately this software can be used by the single producer on a budget, or a large megacompany with an unlimited budget. It’s an unknown, surprisingly, and I hope that this article lets other producers find out about it more easily.
My Disclaimer
I have no relationship with SynchriMedia, the developer of MovieCaptioner. I have no vested interest in the software or the company. I paid the full $99 for the software and put it to work. My only interest in spending hours writing this article is to help other producers who like me, are trying to figure out how to do something seemingly difficult and unknown–the art of adding text to video.
This information here is provided free, without support or warranty. I hope it helps you, and if it does, I only ask that you watch the car show I host and produce called Motorz and help spread the word (I’m always looking for new distribution outlets online and networks on TV, if you have any leads!) At the time of this writing, my half-hour show is available to over 70 Million homes on DirecTV, DISH Network, and thanks to this software it is closed captioned for the Pursuit Channel and My Family TV (broadcast and cable TV).
As I learn more about this process, or readers ask questions that are not answered here, I will do my best to keep updating this article with newer information. Please use the comments area below to ask questions and if I can’t answer them, hopefully someone else will. You should also check out this closed captioning forum at the Creative Cow website. There are a lot of industry experts there that can answer your questions.
My Tools
I use Apple’s Final Cut Pro X for all my post-production work. That includes FCPX for editing and Compressor for final output. My goal was to find closed captioning software that could work with these tools, allow me to transcribe my show in-house, allowing for a quick turnaround time, and finally keeping costs low. MovieCaptioner allows me to do all of this. If you’re using Final Cut for your post-production workflow, hopefully this article will be of great help to you. If you don’t use Final Cut, perhaps you will find some valuable information in this article which will help you with whatever you use.
My Workflow
The networks I work with that currently require CC accept digital delivery in the form of a MPEG2 file (.mpeg). One actually allows me to send them separate .scc files which makes it even easier. They broadcast in standard definition (SD) and allow for FTP file transfer. Because of this, my workflow is very straightforward. This is a tapeless workflow. Although many uplinks now accept digital (tapeless) delivery, many do not. If your network requires tape output with the CC text on line 21, I have no experience in doing this. Also, while MovieCaptioner is quite powerful and has the ability to import from and export to a lot of different formats, the focus of this article is to produce a .scc file for use with Apple’s Compressor.
First, an overview. I’ll go into detail later.
1. Download and install MovieCaptioner. They offer a 14-day trial version which is not disabled in any way. It has every feature you would have if you buy the $99 version. There are no hidden fees or gimmicks, and if you need support they are quick to respond.
2. Transcribe your video! I’m not going to go over the details here as the developer does a great job of showing you how to do this both via video and written instructions. I do have several tips, however, so once you figure out the software I strongly encourage you to check out my tips section, below.
3. Use Compressor to render the final MPEG2 file output, which has an option to include the Sonic Scenarist (SCC) file exported by MovieCaptioner.
4. Send your MPEG2 file off to the network for broadcast. Since this file for a 22-minute show is small enough (under 3GB), it can be put onto a data DVD, USB “thumb” drive, sent via FTP or a file sharing service.
Simple enough? It really is! There are a few details which may help you out. As I said before, I’ll continue to update the details and Tips as time goes by.
My Transcriber
After transcribing the first episode of Motorz, I quickly decided that I needed to hire someone to transcribe the show for me, considering we are wrapping up two full seasons of made-for-TV episodes (24) and it’s a lot of work. My best advice is to find a friend who has a Mac, and can type. My transcriber a friend who does a great job with a quick turnaround. The software is easy to use “even a caveman could do it”. I pay him a reasonable amount of money considering it takes him about 60 minutes to transcribe my 22-minute show. It’s far less than a service, and if I’m in a pinch I could even do it myself.
If you’re interested in my workflow, here it is:
1. From Final Cut I export a version of each episode (without commercials) to a low-quality 320×240 video.
2. I use a file sharing service to send the file that ends up being about 100MB, to my paid transcriber.
3. He uses MovieCaptioner to transcribe the episode, then sends me back the .mcpt file via email (under 50KB).
4. I spell check it (see my tip about how to spell check the transcriber’s work, below).
5. The networks I work with that require CC also allow different amounts of commercials (a.k.a. “producer ad avails”) so I copy the .mcpt file to 2 different folders that contain the 2 different .mov files so that I can shift the timecode/transcriptions down based on the length of the commercial breaks (see tip below on how to do this).
Details
I left all of the MovieCaptioner settings (preferences) alone. I’ve finished 12 episodes of Motorz using this workflow, and two completely different networks have QC’d those episodes and all have aired without fail. This works.
After transcribing your entire video in 4 second chunks, press CMD+S to Save just to make sure it’s saved (it’s usually not necessary to do this since MovieCaptioner does a great job auto-saving your project).
Now you must create the file that will be paired with your video to create the final MPEG2 output. Go to the Export menu and select “Sonic Scenarist (SCC File Only)”. Note that there are two SCC options. You want the second one.
This will create a .scc file in the folder you specify. It is a standard text file that can be opened in any editor. Or you can just highlight it in Finder and press the spacebar on your keyboard to preview. It should look like this:
Scenarist_SCC V1.0
00:00:00:00 9420 9420 94ae 94ae 1370 1370 97a1 97a1 49a7 6d20 4368 f2e9 7320 c475 6be5 2061 6e64 20f4 ef64 6179 20ef 6e80 94d0 94d0 97a1 97a1 cdef f4ef f27a 20f7 e5a7 f2e5 20f4 61ec 6be9 6e67 2061 ecec 2061 62ef 75f4 9470 9470 97a1 97a1 7370 61f2 6b20 70ec 7567 73ae 942f 942f
00:00:03:25 9420 9420 94ae 94ae 94f8 94f8 942f 942f
At this point you should have your video (such as a Quicktime .mov file) and your closed captioning for that video (a .scc file). Now it’s time to pair them up in Compressor and render your final MPEG2 output. Here’s how.
1. Locate your Quicktime .mov file in Finder. Right-click it and select Open With > Compressor.
2. Locate from the Settings window, Settings Tab, locate Apple > Formats > MPEG-2 > Program Stream. Check the properties in the Inspector window to make sure they match what your network is looking for. If it differs, duplicate the MPEG-2 Program Stream setting and make your changes (it will then show up in the Custom group/folder).
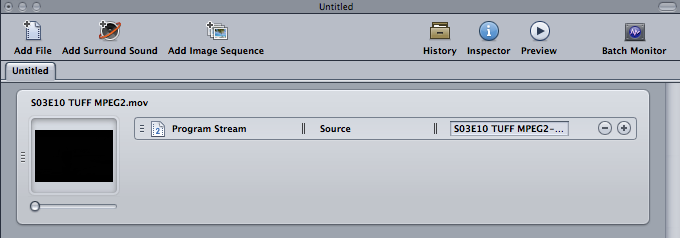
3. Drag that setting to your video above in the “Untitled” window. It should look similar to this: (click to enlarge)
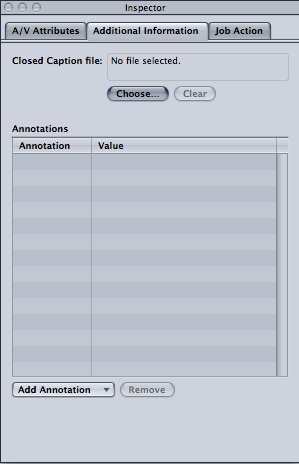
4. Now pair your .scc file, which contains your closed caption text, to your video. Click the thumbnail. You will see the tabs in the Inspector window change. Select the “Additional Information” tab, then under “Closed Caption file” click the “Choose…” button and select your .scc file.
5. Now that you’ve selected your MPEG2 program stream profile and your .scc file, you’re ready to go!
6. Click the “Submit…” button and Compressor will get to work. Here’s a tip here: check “include unmanaged services on other computers” even if you don’t have any other services or any other computers. This will use the full power of your CPUs. For example, on my 8-core Mac Pro which shows up as 16 CPUs, if I don’t check this box Compressor will use only 8 of my CPUs. By checking this box, Compressor uses all 16 CPUs and things will go a lot faster!
Seeing Is Believing!
Once Compressor is finished, you will have a .mpeg file in the same folder as your .mov. So how do you view the closed captioning? I have yet to figure this out with the Quicktime Player (v7 or “X”) but I will tell you what does work.

1. Download the free VLC Media Player. Open your .mpeg file using VLC.
2. Go to the Video menu and select Subtitles Track > Closed Captions 1
3. Wait for a few seconds of video to pass and you should see your CC text at the bottom of the screen. Note that initially it may appear garbled as VLC tries to pick up the encoded text. Don’t panic. It’s probably fine (watch it again to confirm). Also, the way the text appears in the VLC player is not how it will appear on TV. This is just a font style the player uses to render your text.
Tips
1. Spell check. This next step isn’t necessary, but I do recommend it. After transcribing your video (and before exporting to the SCC file), quit MovieCaptioner. Now open the .mcpt file in TextEdit. This Mac app allows you to view the raw text data file created by MovieCaptioner. Since there is no included spell checker, I’ve found a quick way to check your spelling before exporting.
You do not want to use a word processor to edit the .mcpt file. You should also create a backup before continuing.
Scroll down until you see your plain text that you’ve typed. Look for words that are underlined in red (indicating a misspelled word). If you have any, right-click to select a suggested replacement, or fix the word on the spot. Just be careful not to make too many drastic changes to this file. Once you’re done, Save and Quit TextEdit. Re-open MovieCaptioner, make sure everything looks fine and then move on to Export.
2. While transcribing do not use the pipe (“|”) symbol. When you export to SCC MovieCaptioner will automatically insert the pipe symbols for you based on available space.
3. Use VLC to preview your closed captioning in your final .mpeg file. Go to the Video menu and select Subtitles Track > Closed Captions 1.
4. Check “include unmanaged services on other computers” in Compressor when submitting your job. It will use all of your CPU resources and complete the job a lot faster.
5. To shift captions up or down in time (change minutes, seconds, frames) use MovieCaptioner’s menu option Edit > Shift Start Times. But before you do, select all of the rows you want to shift, then go to that menu option. Enter the number of seconds to shift, then select the appropriate radio buttons in that dialog. This is helpful if you transcribe one version of your video without commercials, then have two or more versions of your commercial breaks for different broadcast networks.
6. MovieCaptioner can be used to import and export from a variety of formats. You can easily take your transcribed video and export for YouTube, Windows Media, and many other formats.
7. Let YouTube help you get a head start! You may have noticed that YouTube will automatically transcribe the videos that you upload using its speech-to-text technology. It’s not perfect, but it’s something. Here’s how to take advantage of it. Download the YouTube transcription of your video by going to My Videos then click the Edit button next to your video. Go to the “Captions and Subtitles” tab and you’ll see a Download button next to “Machine Transcription”. This will download a captions.sbv file to your computer which you can then import into MovieCaptioner, tweak, and move on. It can save you a lot of time if it works well. Unfortunately for me, it doesn’t work that well. Here’s an example:
0:00:00.610,0:00:07.610
i’m chris tickets and motors were installing
a big brake kit alarm us today
What did I really say?
I’m Chris Duke and today on Motorz we’re installing a big brake kit on our Mustang.
Close, but not close enough to use for me. Maybe it works better for you?
8. If YouTube’s automatic transcription isn’t working out for you and typing isn’t your gig then try using your own speech-to-text software. At MovieCaptioner’s website there’s a video tutorial on how to use Nuance Dictate (formerly MacSpeech Dictate) to speak into a microphone and have your computer type for you. If you can dial in that software, this can be very effective. Personally, I tried MacSpeech Dictate a year or more ago and it didn’t work out for me. It was probably my strong accent :)
9. Once you do have a good caption file, use the app’s Export feature to export your captions to a .srt file. Upload that to your YouTube video and suddenly your YouTube videos now make sense to the hearing impaired, and with YouTube’s beta translation service your captions are also instantly available in dozens of other languages. It’s quite impressive (see my other article).
How It Came To Be
I spoke with Patrick Besong, the developer of MovieCaptioner, about how his software came to be. It is a typical situation: software born out of necessity, growing into something huge based on customer feedback. Here’s what Patrick told me:
When I first started out with this software, I was only trying to make an easier way to embed QT text tracks in movies. As more people used it, I got more requests. Someone from NASA needed to create SAMI captions for Windows Media, someone else needed STL files, YouTube came out with support for SRT and SUB files, Adobe supported xml files, etc. Most of those were easy, as they were just text files. It was just a matter of creating properly formatted files.
I got into the SCC captions because someone from NOAA needed to be able to take SCC files and export them to other formats like Flash, and he wanted to import the SCC files into MovieCaptioner. To do that I had to learn as much as I can about the format, which looked like gibberish to me initially, but within a few months I had the import working. Then I decided to take on the export, which was much more complicated. I think it took me a year (and I’m still improving it) to where I got it to output valid SCC files. So, it was all kind of in a round-about way, format by format till it got to where it is today.
Patrick, thank you for such great software, with the budget producer in mind. Your support of my show and my article is fantastic! I also greatly appreciate you adding this banner to your website, too.

Article Reaction
I love hearing from others about how this article has helped them. Here’s some feedback I’ve already received… what is your reaction?
“This article is absolutely fantastic!!! Thank you so much. I truly appreciate your kind words and the fact that you would take the time to write such an article. I know it will help me for sure, but much more than that it will help countless video producers that are facing the same obstacles. Well done! I will be sending this link along to some people who have recently inquired about this process. Thanks again!” -Patrick Besong, MovieCaptioner developer at SynchriMedia
“This will surely help in my always-difficult battle to appease the FCC. The more knowledge I have that I can readily distribute to other producers, the better off we will all be.” -Mike Snowden, Content Operations, TUFF TV
Important Links
1. Closed Captioning Software for PC and Mac OSX
3. Closed captioning help forum
4. Watch Motorz TV! (A real 30-minute television show transcribed using MovieCaptioner for broadcast television)
Updates
A lot happened after I’ve written this article. I’ll try to keep this updated over time, so if you’re interested just bookmark this article and come back to this section from time to time.
3/1/12 – Not too long ago Patrick released a Windows/PC version of MovieCaptioner. It is currently available and works just the same as it does on the Mac.
3/20/12 – After experimenting more with YouTube and its incredible caption features, I wrote this article, “Caption This!”. I encourage you to read it, as it will tell you exactly why it’s so important to take the extra step to transcribe your videos for YouTube (hint: automatic translation!)
3/21/12 – Patrick informed me about a Quicktime plugin called HDProQT which allows you to export directly from Final Cut Pro 7, Premiere, or QuickTime Pro as a MPEG stream with SCC captions. It’s pricey at $1,495, but there is a demo version.
5/17/13 – Free eBook! Patrick Besong has just published a FREE eBook (available currently only for the iPad). This book includes excerpts from this page (see pages 23-24). Download it here at iTunes.
Need More Help?
Do you need more help or have a tip of your own to share? Please use the comments area below or check out the forum mentioned above.
My workflow above is a very easy one for me to manage, and after you do the first one it’s easy to crank out more. Since there are a few steps involved, I usually do several episodes at once. I hope you’ve found this information beneficial and I would greatly appreciate your comments, below.
Chris Duke
Host & Executive Producer
Motorz TV
Discover more from Chris Duke
Subscribe to get the latest posts sent to your email.
ayo
Apr 26, 2017 (11:52 am)
Awesome! thanks… this was just the feedback I was looking for!